클래스와 객체
1. 클래스 객체
[1]클래스
객체를 만들어내기 위해 정의된 틀
클래스는 객체,실체가 아님
멤버 변수와 멤버 함수 선언
[2]객체
객체는 생성 될 때 클래스의 모양을 그대로 가지고 탄생
멤버 변수와 멤버 함수로 구성
메모리에 생성, 실체(instance)라고도 부름
하나의 클래스 틀에서 찍어낸 여러 개의 객체 생성 가능
객체들은 상호 별도의 공간에 생성
2. 클래스 구현 순서
[1]선언부
class 키워드를 이용하여 클래스 선언
멤버 변수와 멤버 함수 선언
(단, 멤버 변수는 클래스 선언 내에서 초기화 할수 없으며 멤버 함수는 원형 현태로 선언)
[2]구현부
클래스에 정의된 모든 멤버 함수 구현
3. 객체생성방법
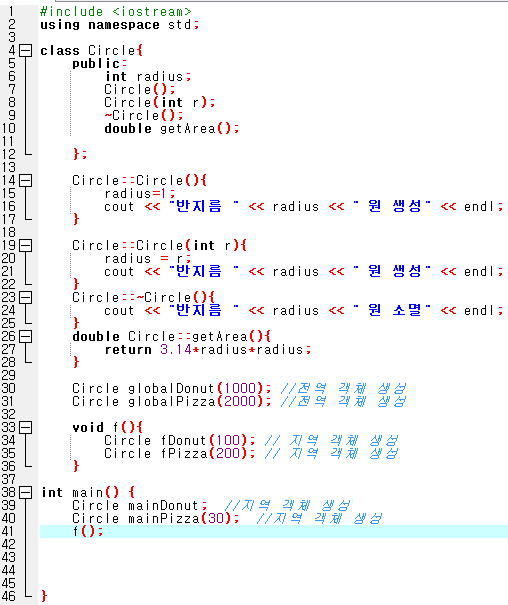
donut,pizza,cake 예제코드
Circle donut; // 도넛 객체 생성
Circle pizza; // 피자 객체 생성
Circle cake; // 케이스 객체 생성
4. 객체의 멤버 변수, 함수 접근 방법
(예제코드)
donut.radius = 1; // donut 객체의 radius 멤버에 1 기록
double area = donut.getArea(); // donut 객체의 면적 알아내기
pizza.radius = 30; // pizza 객체의 radius 멤버에 30 기록
area = pizza.getArea(); // pizza 객체의 면적 알아내기
cake.radius = 20; // cake 객체의 radius 멤버에 20기록
area = cake.getArea(); // cake 객체의 면적 알아내기
5. c++의 파일 분리 방법 (.h,.cpp, main.cpp)
getArea.h 에는 클래스 선언
class Circle {
public:
int radius; // 반지름
double getArea(); // 멤버함수
};
class Rectangle {
public:
int width;
int height;
int getArea();
bool isSquare();
};
getArea.cpp 에는 클래스 구현(단, 클래스 헤더 파일 include)
#include "getArea.h" // width height radius
double Circle::getArea(){
return 3.14 * radius * radius;
}
Rectangle::getArea(){
return width*height;
}
bool Rectangle::isSquare(){
if (width == height)
return true;
else
false;
}
main.cpp 에는 전역 함수나 변수를 저장함(헤더 파일 include)
#include <iostream>
#include "getArea.h" //프로그래머가 만든 헤더 추가
using namespace std;
int main(int argc, char** argv) {
Circle donut;
donut.radius=1;
double area = donut.getArea();
cout << "donut의 면적은" << area << endl;
Circle pizza;
pizza.radius = 30;
area = pizza.getArea();
cout << "pizza의 면적은 " << area << endl;
Circle cake;
cake.radius =20;
area = cake.getArea();
cout << "cake의 면적은" << area << endl;
Rectangle rect;
rect.width = 5;
rect.height = 5;
cout << "사각형의 면적은 " << rect.getArea() << endl;
if(rect.isSquare()) cout << "rect는 정사각형입니다." << endl;
return 0;
}
6. BankAccount 예제
#include <iostream>
#include "BankAccount.h"
using namespace std;
int BankAccount::getAccountNumber(){
return accountNumber;
}
string BankAccount::getOwner(){
return owner;
}
int BankAccount::getBalance(){
return balance;
}
void BankAccount::setAccountNumber(int maccountNumber){
accountNumber = maccountNumber;
}
void BankAccount::setOwner(string mowner){
owner = mowner;
}
void BankAccount::setBalance(int mbalance){
balance = mbalance;
}
void BankAccount::deposit(int amount){ // 입금하기: amount 금액만큼 잔액증가
balance += amount; //balance=balance+amount;
}
void BankAccount::withdraw(int amount){ // 출금하기: amount 금액만큼 잔액감소
balance -= amount; //balance=balance-amount;
}
<BankAccount.cpp>
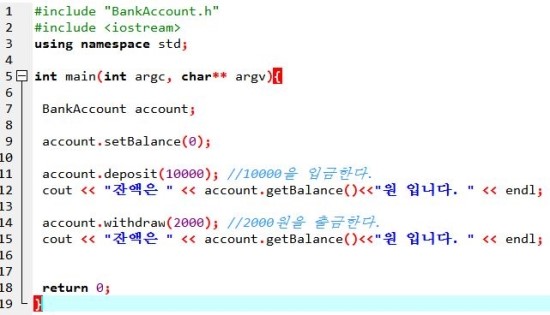
#include "BankAccount.h"
#include <iostream>
using namespace std;
int main(int argc, char** argv){
BankAccount account;
account.setBalance(0);
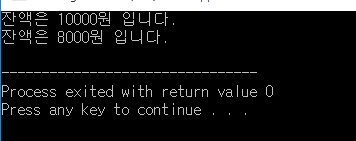
account.deposit(10000); //10000을 입금한다.
cout << "잔액은 " << account.getBalance()<<"원 입니다. " << endl;
account.withdraw(2000); //2000원을 출금한다.
cout << "잔액은 " << account.getBalance()<<"원 입니다. " << endl;
return 0;
}
<main.cpp>
class BankAccount{
private:
int accountNumber; // 계좌번호
string owner; // 예금주
int balance; // 잔액
public:
int getAccountNumber(); //accountNumber 접근자
string getOwner(); // owner 접근자
int getBalance(); // balance 접근자
void setAccountNumber(int maccountNumber); //accountNumber 설정자
void setOwner(string mowner); // owner 설정자
void setBalance(int mbalance); // balance 설정자
void deposit(int amount);
void withdraw(int amount);
};
<BankAccount.h>
<소스코드>
<실행결과>
<main.cpp>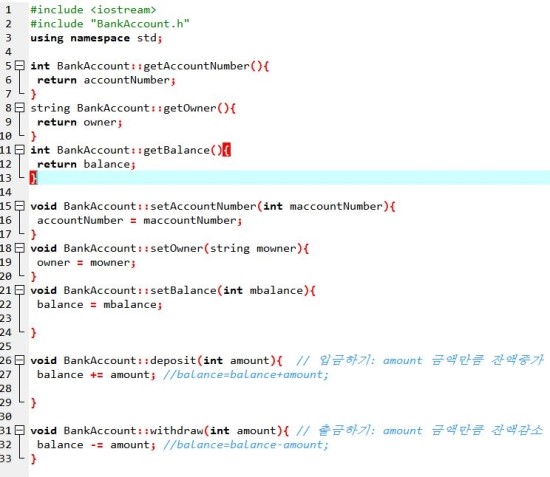
<bankaccount.cpp>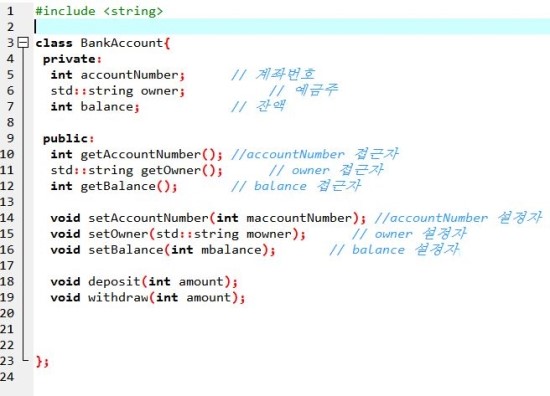
<bankaccount.h>
<주석>
7.
3.4 생성자
1. 생성자를 사용하는 이유
생성자 초기화를 위해
객체가 생성될때 자동으로 실행됨
3. 생성자 함수이름
클래스 이름과 동일하게 짓는다
4. 생성자가 자동으로 생성 : 기본생성자
Circle donut처럼 매개변수가 없는 객체 생성할때 기본 생성자 자동으로 생성
5. 생성자가 자동으로 생성되지 않는 경우
생성자가 하나라도 만들어져 있으면 ex)pizza(30) 자동으로 만들지 않는다
6. 예제3-4 소스코드, 실행결과, 주석
<소스코드>
#include <iostream>
using namespace std;
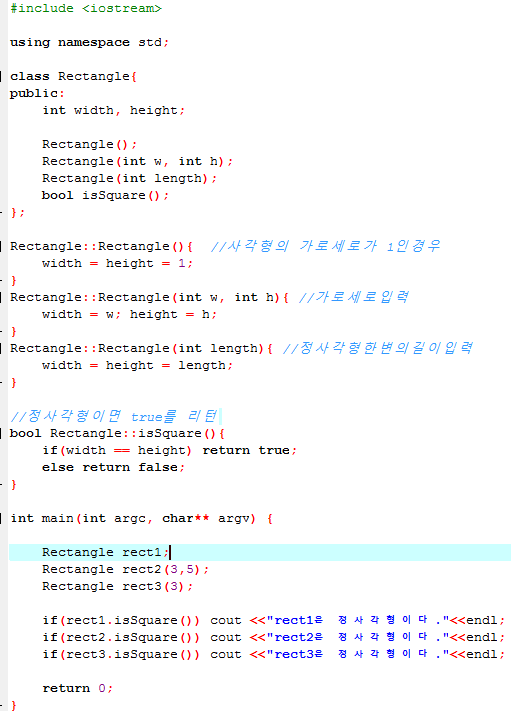
class Rectangle{
public:
int width, height;
Rectangle();
Rectangle(int w, int h);
Rectangle(int length);
bool isSquare();
};
Rectangle::Rectangle(){
width = height = 1;
}
Rectangle::Rectangle(int w, int h){
width = w; height = h;
}
Rectangle::Rectangle(int length){
width = height = length;
}
//정사각형이면 true를 리턴
bool Rectangle::isSquare(){
if(width == height) return true;
else return false;
}
int main(int argc, char** argv) {
Rectangle rect1;
Rectangle rect2(3,5);
Rectangle rect3(3);
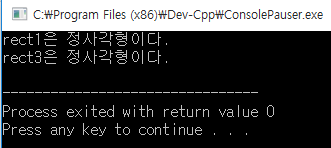
if(rect1.isSquare()) cout <<"rect1은 정사각형이다."<<endl;
if(rect2.isSquare()) cout <<"rect2은 정사각형이다."<<endl;
if(rect3.isSquare()) cout <<"rect3은 정사각형이다."<<endl;
return 0;
}
<주석>
8.소멸자
1.프로그램 3-5 소스,실행결과
#include <iostream>
using namespace std;
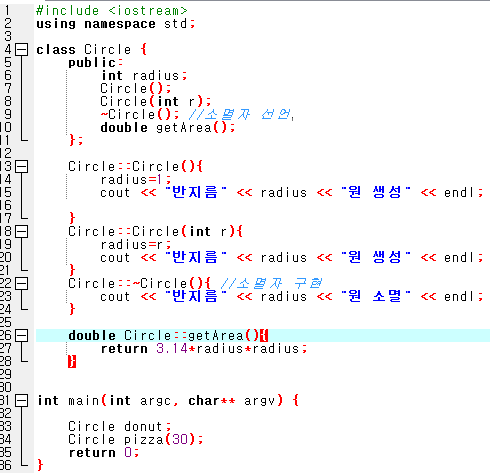
class Circle {
public:
int radius;
Circle();
Circle(int r);
~Circle(); //소멸자 선언
double getArea();
};
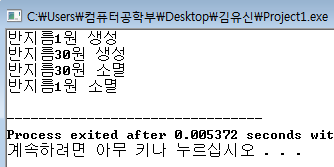
Circle::Circle(){
radius=1;
cout << "반지름" << radius << "원 생성" << endl;
}
Circle::Circle(int r){
radius=r;
cout << "반지름" << radius << "원 생성" << endl;
}
Circle::~Circle(){
cout << "반지름" << radius << "원 소멸" << endl;
}
double Circle::getArea(){
return 3.14*radius*radius;
}
int main(int argc, char** argv) {
Circle donut;
Circle pizza(30);
return 0;
}
<소스코드>
<실행결과>
<주석>
2. 소멸자 실행 : 객체 자동, ~을 붙임으로써 만듬
소멸자 오직 한개만 존재 => 6개생성
3. 소멸자 순서 : 실행의 역순
4. 전역객체 main()함수 밖 -> 프로그램 실행 전 영역 미리 할당
5. 프로그램 3-6 소스, 결과
#include <iostream>
using namespace std;
class Circle{
public:
int radius;
Circle();
Circle(int r);
~Circle();
double getArea();
};
Circle::Circle(){
radius=1;
cout << "반지름 " << radius << " 원 생성" << endl;
}
Circle::Circle(int r){
radius = r;
cout << "반지름 " << radius << " 원 생성" << endl;
}
Circle::~Circle(){
cout << "반지름 " << radius << " 원 소멸" << endl;
}
double Circle::getArea(){
return 3.14*radius*radius;
}
Circle globalDonut(1000); //전역 객체 생성
Circle globalPizza(2000); //전역 객체 생성
void f(){
Circle fDonut(100); // 지역 객체 생성
Circle fPizza(200); // 지역 객체 생성
}
int main() {
Circle mainDonut; //지역 객체 생성
Circle mainPizza(30); //지역 객체 생성
f();
}
<소스코드>
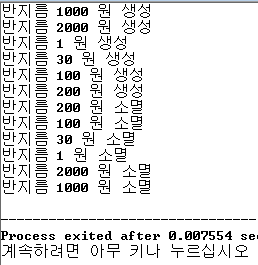
<실행결과>
<주석>
6. 프로그램 3-9 소스, 결과
<main3>
#include "Calculator.h"
int main() {
Calculator calc; // calc 객체 생성
calc.run(); //계산기 시작
}
<Adder.h>
#ifndef ADDER_H
#define ADDER_H
class Adder {//덧셈 모듈 클래스
int op1, op2;
public:
Adder(int a, int b);
int process();
};
#endif
<Adder.cpp>
#include "Adder.h"
Adder::Adder(int a, int b){
op1 = a; op2 = b;
}
int Adder::process(){
return op1 + op2;
}
<Calculator.h>
#ifndef CALCULATOR_H
#define CALCULATOR_H
class Calculator { //계산기 클래스
public:
void run();
};
#endif
<Calculator.cpp>
#include <iostream>
using namespace std;
#include "Calculator.h"
#include "Adder.h"
void Calculator::run(){
cout << "두 개의 수를 입력하세요>>";
int a, b;
cin >> a >> b; //정수 두 개 입력
Adder adder(a, b); //덧셈기 생성
cout << adder.process(); //덧셈 계산
}
<소스코드,주석>
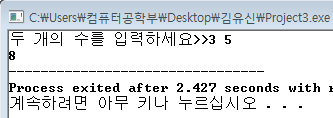
<실행결과>
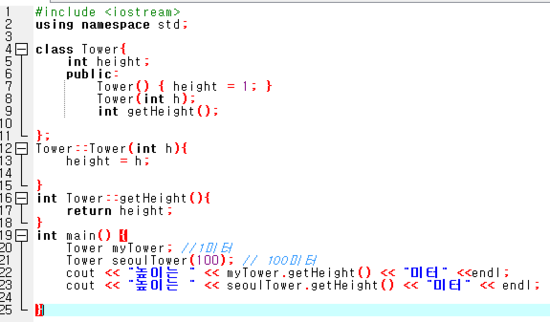
7. 실습문제 1-Tower()클래스 소스코드,실행결과
#include <iostream>
using namespace std;
class Tower{
int height;
public:
Tower() { height = 1; }
Tower(int h);
int getHeight();
};
Tower::Tower(int h){
height = h;
}
int Tower::getHeight(){
return height;
}
int main() {
Tower myTower; //1미터
Tower seoulTower(100); // 100미터
cout << "높이는 " << myTower.getHeight() << "미터" <<endl;
cout << "높이는 " << seoulTower.getHeight() << "미터" << endl;
}
<소스코드>
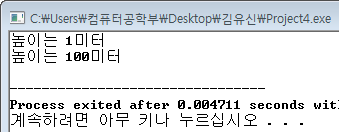
<실행결과>
<주석>


댓글
댓글 쓰기